Does compostable plastic really compost?

Returning to the Big Compost Experiment

As you may have noticed, I’m getting increasingly nutty about compost (currently researching compost loos and humanure – hahaha! watch out for more on that). Now that I’m finally getting the hang of it, I’m beginning to reap the ‘black gold’ rewards. It really it the BEST FUN opening my bin and digging out all that wonderful dark brown crumbly compost that a few months before had been the slimey contents of our food scraps bin.

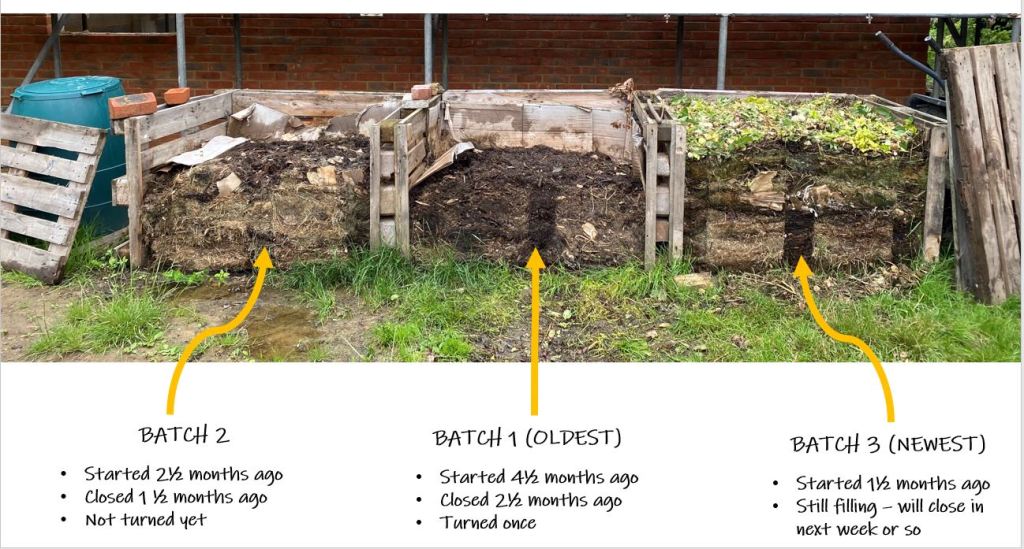
I emptied out one of my Green Johanna bins (pictured above) just a few weeks ago after having left it for 5 months to mature, with no new additions. It was joyful as always to scoop out all the compost…

But I was also really curious to discover the results of my experiment – my small contribution to UCL’s Big Compost Experiment. Would the ‘compostable’ plastics that I put in when I started the bin off in November still be there, or would they have composted along with the food scraps and garden cuttings?

Drum roll……

And, hmmm…. a mixed picture. Let me run you through it.

The Results

Item 1 – Paper hot drink cup with starch-based plastic lining

This was great news because there was no sign of it at all. Paper and cardboard compost really easily so no surprise about that. The plastic lining of these cups is so thin that we barely notice it, so it makes sense that it composted easily – just as a thin lettuce leaf would perhaps.

Item 2: Hot drink cup lid made of plant-based plastic (PLA)

The thicker plastic of the lid was a different story. Pretty much the whole of the lid was still recognisable, although it was now in fragments and the opaque white colour had become mottled in parts. Obviously this item needs quite a lot more time in the compost bin, or different conditions, to decompose effectively. The mottling and fragmentation could be early signs of decomposition, but it seems just as possible that the breaking is simply damage from being squashed in the bin.

Item 3: Salad pot made of plant-based plastic (PLA)

With this third item, a clear plastic salad pot, there was no visible evidence of decomposition at all. The pot was cracked but was that simply damage from being in the bin?

As an aside though, I also found another pot of the same type that wasn’t one of my official experiment items so I don’t have a record of when I put it in. However, I think it had already had a stint in a bin – perhaps 6 months or more – been pulled out as a ‘reject’ and put into this batch to ‘go again’. So it’s probably had 18 months or so already in the bin. As you can see, it’s warped in places, and is more opaque, so material changes are definitely occurring…but still it has the same weight/strength that it started with. I would guess it still has at least 12 months more to go.

Plant-based plastic salad pot showing signs of decomposition – length of time in bin between 12-18 months

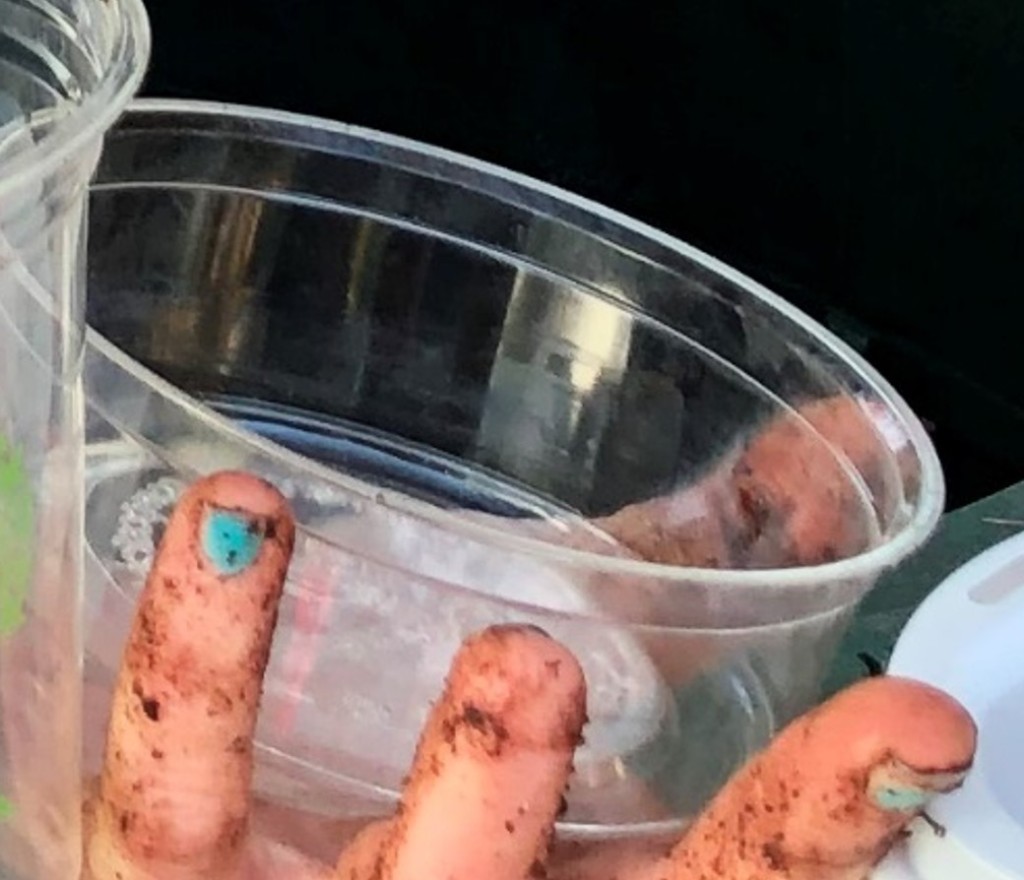
Item 4: Cup made of plant-based plastic (PLA)

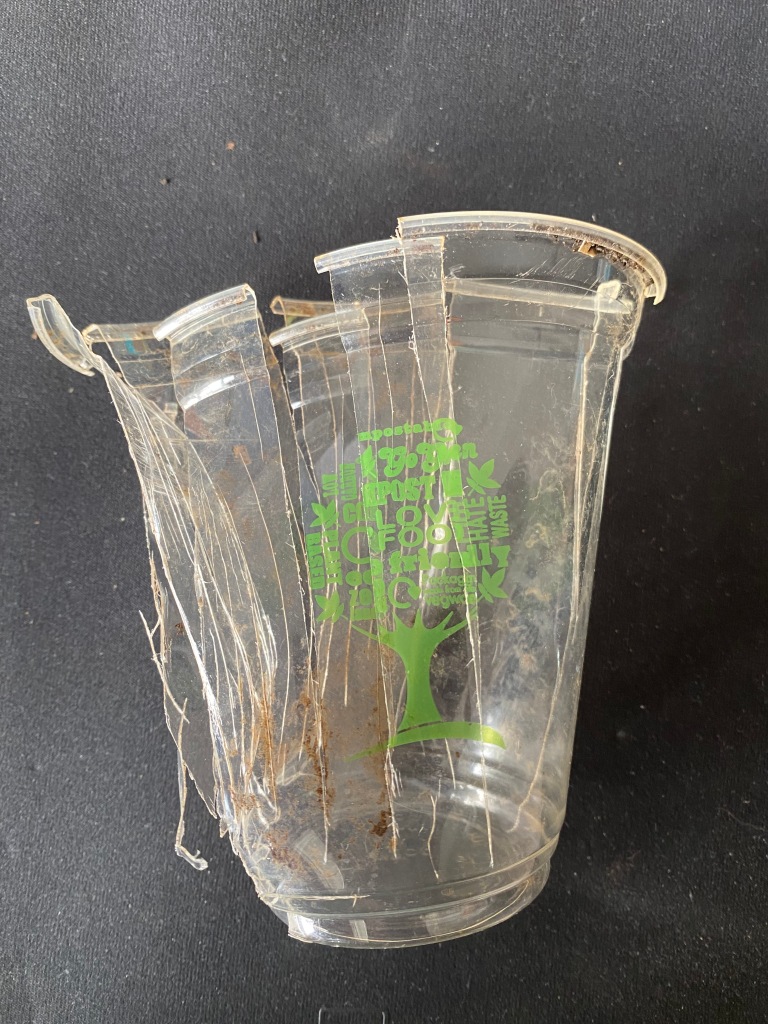
Finally, the clear plastic cup, and again the only change was breakage that could as easily have been caused by crushing as by any biological/chemical changes.

My results are consistent with the results so far submitted by other home composters who have taken part in the UCL study. The most recent report states that 71% of participants said the compostable items were still visible at the end of their usual time-frame for producing compost (for most people this was 12 months), and only 32% reported that the items were no longer visible.

Conclusions & Questions

So, three out of four of my compostable items haven’t composted…yet. What to conclude from all this? It brings up so many questions doesn’t it? I’ve been looking into some of these and will share what I’ve found out so far…

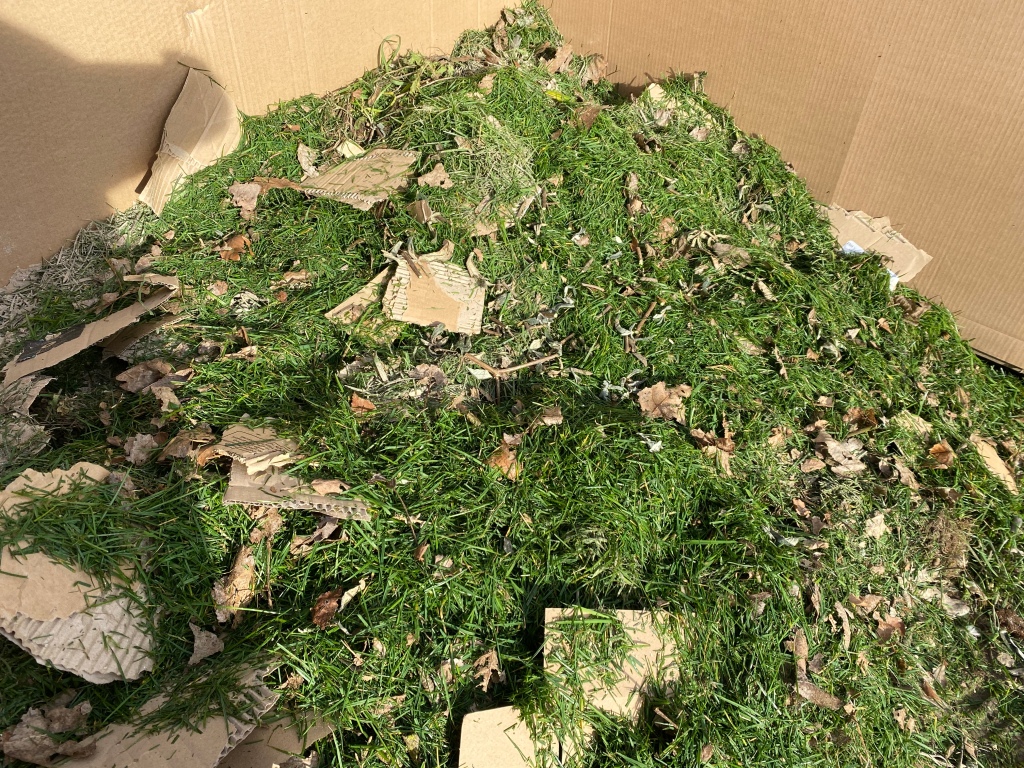
Will the items compost eventually? They will, but based on progress so far, I think it could take at least another year- probably more. It’s just the same with ordinary organic material – soft and moisture-rich ingredients like fresh grass and leaves compost in no time, harder, drier ingredients like woody stems or fruit stones take longer, and twigs and branches aren’t really worth putting in at all as they take so long. I suspect that it’s the same story with compostable plastic. The thin stuff like the lining on the cup and the bags we can buy to put food waste in compost easily, but more sturdy plastics, like the lid, pot and cup in my experiment may take so long that they just become a nuisance. It would probably be quicker in a hotter bin, which I do have (this one was only a few degrees above ambient temperature, but I have another than gets up to 70 degrees C), but only because I work really hard at maintaining it. Most people don’t have the kind of time and obsession for it that I have!

What is PLA and what will it become when composted? PLA is a polymer commonly used to make semi-rigid single-use items like items 2, 3 and 4 in my experiment. It stands for poly-lactic acid and is made from lactic acid, an acid that is also found in fermented foods such as kimchi and yoghurt. Like us, soil microbes like to eat this acid and use it to grow. So eventually PLA plastic becomes biomass.

What does ‘commercially compostable’ mean? The salad pot, made by well-established eco-packaging company Vegware, is labelled ‘commercially compostable’. This is Vegware trying to be clearer with consumers about the fact that they can only guarantee that the plastic will compost in a reasonable time frame if the process takes place in a commercial/industrial setting where high temperatures and specific air and moisture levels can be consistently maintained. The EU standard for this requires the compostable plastics to disintegrate after 12 weeks and completely biodegrade after six months. Obviously this is very different to what is happening in home composters’ bins based on mine and UCL’s research results.

Does the council compost compostable plastics? Very few councils in the UK (perhaps none?) send compostable plastics for composting in the industrial composting facilities mentioned above, including my own here in Kent. You might think that they could be added to the food or garden waste that many councils collect, but this is not the case. Any plastics detected in these waste streams will be rooted out before they are composted. There are two main reasons for this: 1) where the waste is being recycled into liquid fertiliser via anaerobic digestion, this is not suitable for composting plastic, 2) where the process is suitable for composting plastic the logistical/economical challenges of rooting out contaminants (e.g. non-compostable items put in by mistake) are too great.

What bin should compostable plastic go in if I’m not composting at home? The only option is into general waste, which will either go to landfill or incineration. Plant-based plastic is considered a contaminant in the recycling stream. As the UCL website puts it, ‘No one wants a recycled waterproof plastic sheet that rots away when it rains’.

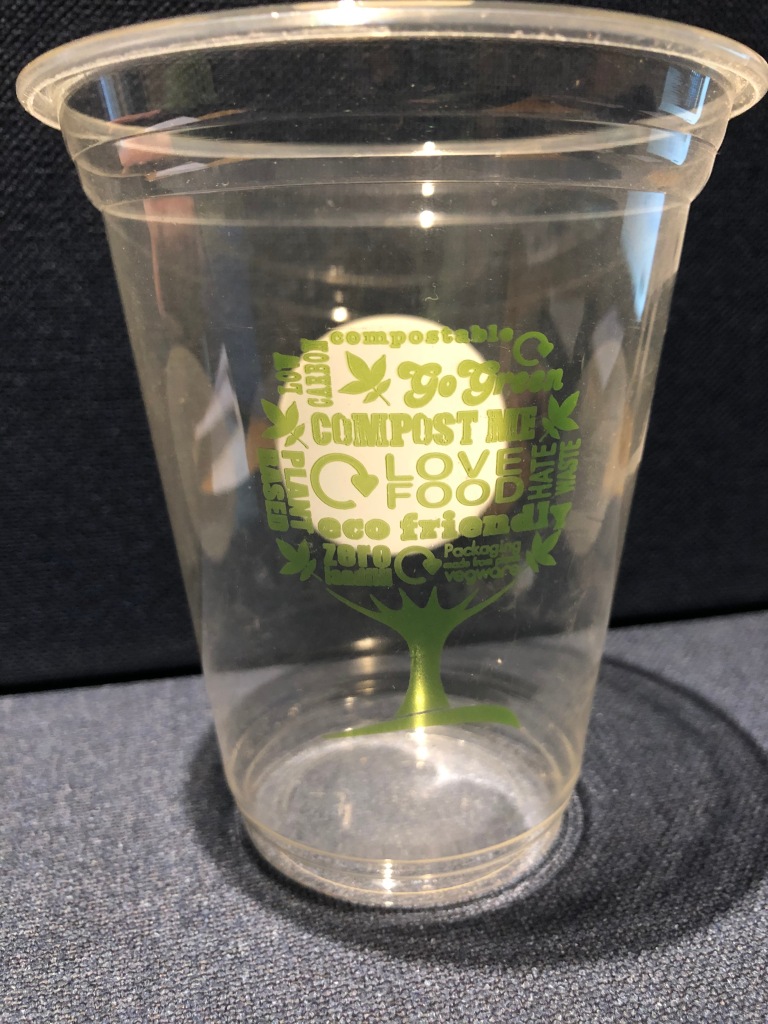
Is single-use compostable plastic a solution to the plastic pollution crisis? While replacing petrol-based plastics with plant-based ones sounds like a great idea, I think that all the answers above make it clear that it is creating more problems than it solves. Manufacturers have launched these products onto the market declaring them to be ‘compostable’ and wonderfully green and friendly (zoom in on the the branding on the clear cup in the picture above for a flagrant example of this), even though it’s very hard to compost at home in any reasonable time-scale and there’s no council provision for composting either. If they’re dropped as litter they’re as harmful as any other plastic, and if they’re put in the recycling bin they’re a contaminant, Misleading and confusing people like this leads to cynicism and distrust. Manufacturers, the recycling/composting industry and government should work together to close the loop so that ‘compostables’ can actually be composted. But more importantly, in my view, much more should be done to get away from the whole idea of ‘single use’ and throwaway products. The carbon footprint of one single use plastic cup is still very high, even if it is is made of plants….think of all the farming and factory processes, transportation and emissions produced just to get that cup into your hand for a a few minutes…and then the transportation and incineration to dispose of it. It’s still bonkers, and massively wasteful, even if it is made of plants!

EDIT (5/10/21) I have just watch UCL’s Plastic Waste Innovation Hub’s webinar, reporting on their research into compostable plastics. It was encouraging to hear that a lot of effort is currently going into closing the loop for compostable plastics, with stakeholders from all stages (product manufacturers, labelling designers, waste processors, local authorities, central government…) all talking together. Let’s hope they get that loop closed very quickly!

What next?

I’ll put the various pieces I have back into one of my Green Johanna bins now and see what has happened to them when I next empty the bin around the middle of next year. I would also like to put some into my hotter bins to see if that makes a difference.

References

News from the Compost Kitchen

Back in February I shared my composting-beginner’s pride at having managed to put together this three-bay compost kitchen, made out of old pallets drilled together. Here’s the post if you want to see the details of how I put it together.

Well, my rapidly-growing batches of compost have continued to be my pride and joy, and filling the bins has become an absolute favourite garden activity – I tend, tweak, feed and check temperatures like a crazy lady with her pampered pet (or a crazy chef…or crazy scientist…all of these metaphors kind of work!).

I get so excited to see the ‘magic’ happening, as the temperatures go up, and the various ingredients I’ve added break down with the help of bacteria, fungi, worms, and a host of other organisms – making the most magnificent compost – a living, thriving ecosystem in its own right, a precious resource for feeding and replenishing my soil.

So here’s me in the pic above with the three bays as they are today – 5 months on from when I started to fill them. As I explained back in February, the idea of the three bays was originally as follows…

  1. The filling bin
  2. The leave it alone to mature bin
  3. The use it bin

I’ve had so much incoming material however, that I now have two maturing bins and one being filled. What’s more, the one I’m filling is pretty much done, so I’ve just started a fourth in a spare old bay nearby!

My plan is to give all the veggie beds a layer of compost in the autumn. Following ‘no dig’ principles, I won’t dig it in, rather I’ll let the worms and winter frosts incorporate and break it down ready for next spring.

I’ll be using the compost that is currently maturing in the first two bays, so it looks like I’ll have about 1m square for the veggies. It looks like a lot, but still I’m not sure if that will be enough for all the beds. We will see!

Compost Ingredients

Listed below are the things I’ve been adding to these heaps over the last few months. I intersperse layers of so-called ‘greens’ and ‘browns’ (nitrogen-rich and carbon-rich) to make sure to get the perfect balance of moisture and air into the heap.

Greens(Nitrogen-rich / Adds moisture)

  • Grass cuttings (This is the No 1 super-ingredient as it is plentiful and really turns up the heat. I’ve been adding grass once a week.)
  • Weeds (Chopped up into pieces max 3 inches – see more on this in next section)
  • Prunings/cuttings (From flower and veggie beds – again, always chopped up small)

‘Browns’ (Carbon-rich / Adds structure and air)

  • Dried out prunings/cuttings/weeds (cut up into pieces max 3 inches long)
  • Ripped up brown cardboard or paper (I avoid glossy/coloured stuff)
  • Wood chippings (donated by my neighbour tree surgeon)
  • Wood ash (just a handful now and then)

I don’t put any of the kitchen scraps in here. Although I could put some kitchen scraps, like veggie peelings and coffee grounds, in an open bin like this, I usually put all my kitchen scraps together in one tub – that includes the cooked food and meat/dairy that would attract vermin if I put it in these open bins. Instead all the kitchen scraps go into the plastic Green Johanna bin – see my posts here and here for more information about this type of bin and the compost I get from it.

The need to cut up small

I’ve learnt over the past year or so how important it is to cut up the organic matter that goes into the bin if you want it to turn into decent compost soon enough for you to really be able to use it. We had a compost bin before, but there were long fibrous and woody pieces in there that were taking forever to decompose. with so little of their soft interiors exposed to the bacteria and microbes. Also they created large air pockets throughout the heap, which meant everything was just too dry and cool.

Now I chop things with the shears as I put them in. It takes a while and it’s somewhat fanatical – but I kind of enjoy it (it’s like chopping up veg for the pot) – and it makes so much difference to the heat of the pile, and consequently the speed at which it breaks down.

In the end I went back to the useless heap of sticks that was the old compost pile, wondering how to deal with it. Then I realised that a lot of the stuff in there was so dry and brittle now that it would crush easily in my hands. So, not compost, but a perfect ‘brown’ to balance out the abundance of greens that spring and summer bring to the bins. Maybe this could be a strategy if there’s no time to chop (and you’ve got the space) – leave it for a few years until it’s brittle enough to crush easily and quickly in your hands. A long route to a short cut?

After a year of cool composting, longer and more fibrous cuttings are dry and brittle – easy to crush and add as a ‘brown’

Hot composting and Weeds

Putting weeds into the compost is something a lot of people worry about, for obvious reasons – will they survive the composting process and come back to haunt me, popping up all over the veggie beds next year?

Most of the weed – stalk and leaves – is no danger at all. But roots, or seeds, could be a problem if the compost heap is cool or only warms up a bit, especially of the most vigorous weeds. In this case, a solution I have heard about is to submerge the weeds in a bucket of water for a few weeks to completely kill them, and then add them to the compost after that.

With the temperature consistently above 60 degrees centigrade, weed seeds and roots cannot survive

However, my compost has been getting really hot. Newly added material in the top half of the bin has consistently been between 60 and 70 degrees centigrade. I have heard from a couple of renowned composters (Charles Dowding for one, and Nicky Scott for another), that if the compost gets up to temperatures of 60-70 degrees for a sustained period then any seeds or roots will have been cooked to death. I am taking this chance – all the weeds go in, seeds, roots and all. Fingers crossed they are right…and my thermometer is not wrong!

How about you?

Do you compost? What methods do you use? How does your approach compare to mine? I’d love to hear your experiences and expertise in the comments. 🙂

Meadow Making

Meadow June 2021 – Ox-eye daisies, yellow rattle, buttercups

Here’s me, yesterday, proudly posing with my patch of meadowing success – a tumbling, waving, intertwining, buzzing mixture of grasses and wild flowers. Finally! As everyone warned me, it’s a game of patience – but at last here’s something to show for my efforts. I’ve been pretty despondent about this project at times, wondering whether I was doing it right, or whether there was any point in doing it at all, but while the sun is shining on me and my patch is alive with colour and insects, I thought I’d share my journey so far.

Our meadow

Behind the house there is about an acre of grassland that slopes down to the house. There is a mature damson tree in the middle, and now a sprinkling of young trees planted by us around its margins. The land is tussocky and lumpy – due in part I imagine, to the many many hills thrown up over the years by generations of mining moles.

April 2018 – Our lumpy bumpy slopey meadow

In our first summer, 2018, we had a local tractor driver come by occasionally and cut the grass for us. Meanwhile, we wondered what to do with this area. It was clearly not destined to be a fancy flat lawn, and we had no appetite for attempting to see off the moles – all options for this seemed either useless or brutal.

Letting it grow – The start of it all

At the start of 2019 we had hired our brilliant gardener, Gail, who suggested we leave the grass to grow and see what happened. This idea has now really caught on, with lots of us understanding the wildlife value of leaving the grass to grow, but just two years ago it hadn’t occurred to us. Yet it seemed brilliantly simple and let us off the hook of any complicated landscaping.

What grew was beautiful: tall, soft, billowing Yorkshire Fog grass, interspersed with wild flowers here and there: buttercups and daisies, poppies, common mallow, red and white campion.

We mowed meandering paths through the area. As the grass grew taller and hid the paths from view, they became more and more romantic and magical to walk along – or hide in, for our young daughter.

Yorkshire Fog

This success got me curious about wild flower meadows. Could we develop what was already here and create a meadow with even more flowers? I bought Pam Lewis’ book ‘Making a Wildflower Meadow’ and started my research.

I was soon disappointed. Our beautiful Yorkshire Fog grass was considered too virulent for a wildflower meadow – its vigorous habit would swamp new seedlings trying to get established. Pam Lewis’ suggestion, and others I have read, is that the best way to establish a really good meadow is to scrape off the top soil and start again, laying down more nutrient-poor soil which is what wildflowers do best in (this because the grasses grow more slowly in less nutritious soil, giving the flowers more of a chance to see the light) – and sowing seeds for gentler, less bullying grasses than our Yorkshire Fog.

Yorkshire Fog at various stages of growth – closed/open

I’ve never had the appetite for this though. There’s already so much earth moving going on here with different landscaping and building work – it would be terrible to have the meadow area all bare too. And it would be an immense job – too much for me!

So instead, I have carried on working with the unideal but lovely Yorkshire Fog (read on for important new discovery about this), following all other advice in the hope that we might get some more flowers established despite our grassy impediment.

Replicating hay meadow traditions

Traditional wildflower meadows developed over centuries due to the human activities of hay making and animal grazing. The annual cutting and removing of hay depleted the soil’s nutrients, and then droppings from the grazing animals redressed the balance sufficiently for the hay to grow again. The level of nutrients was just right for wildflowers to grow between the grasses. Furthermore, the hooves of the animals would disturb the soil, leaving bare patches where young seedlings could get established without too much competition from neighbouring grass.

For the last two summers – 2019 and 2020 – I have followed advice to replicate the hay making tradition, by cutting the grass at the end of the summer, leaving the cuttings for a week or two for seeds to drop off and creatures to escape to new homes, and then gathering all the cuttings up. This saves the cuttings from a) adding more nutrition to the soil, b) forming a ‘thatch’ that new seedlings cannot penetrate.

A family weekend brought an impromptu opportunity for some hay gathering

This is not easy – it’s a lot of work! And actually, I’ve only ever managed to collect up grass from about a quarter of the whole meadow area. In 2019 I was lucky that on a sunny family gathering the idea of a picturesque bonding session of hay making struck everyone as a great afternoon’s activity. Last year I was on my own (weren’t we all?) – well my nine year old did help a bit too – and it took me four hours to rake up and clear away about a quarter.

I’m not sure if there’s an easier way. The grass is too long for a mower that could collect. We get our tractor driver to come over. Scything, as many meadowers do, is just a step too far for me at the moment, although I like the idea of a quieter, gentler method than the heavy, noisy tractor.

Of course we had piles and piles of hay. I did ask on the local Facebook page whether anyone would like it but was met with silence. I’ve since learned that some wildflowers, specifically ragwort (which we do have, although not in abundance) is dangerous for horses if they eat it in their hay, so I guess that might explain the disinterest. Still, I can use it for making compost and mulching myself now that I’m getting the hang of those.

It would be handy if I could borrow a sheep or goat or other grazing animal or two for the autumn and winter months – they could keep the grass short and open the ground with their hooves. But with zero experience of looking after live stock I’m not rushing into this just yet!

How to sow the seeds

When sowing onto thick grass rather than bare soil, there has to be a way of getting the seeds into the ground. I’ve tried two approaches to this over the last two years – one mechanical, one natural.

1. Scarifying with the digger – Autumn 2019

To prepare the ground for sowing I did my version of ‘scarifying’, or breaking up the soil. Usually this is done with a rake, but for some reason that I can’t remember now , I used the digger instead – scraping the ground with the bucket ‘teeth’.

Scarifying the area with the digger – Autumn 2019

This was a pretty crude improvisation, and although two years on it looks like it might have had the desired effect, I don’t feel good about the method. With veggie growing I am taking a ‘no dig’ approach, minimising disturbance of the soil as much as possible to avoid damaging the structure of the soil eco-system and to keep the carbon under the ground (see my post on this here) – so I’d like any future meadow work to be no dig too if possible.

2. Sowing into mole hills – Autumn 2020

A no dig method that happened more by accident than design last year was using molehills. I’d bought more seeds but then hesitated all through the autumn about how to sow them. Then as autumn turned to winter and I gazed out the window at the lush green meadow I had the last minute idea of sowing into the hundreds of mole hills that had appeared over the preceding months. No need for scarifying – little pockets of soil were already exposed. I mixed the seeds with sand, sprinkled them onto the hills and squashed them down with my heel. Easy, and completely ‘no dig’!

The choice of flowers

Both years I sowed from two packets:

  1. Seed Mix (Boston Seeds ‘Restore and Enrich’) – 23 native wildflowers, including annuals such as red poppies and cornflowers, and perennials, such as ox-eye daisies and meadow buttercup.
  2. Yellow rattle seeds

More on Yellow Rattle

Although the Boston Seeds mix already included some Yellow Rattle I sowed extra as it is a ‘wonder-flower’! As well as being a pretty, pollinator-friendly flower in its own right, it also helps to hold the grass in check. It is semi-parasitic and feeds on the grass, thus reducing its energy to grow too quickly and vigorously. Consequently the yellow rattle, and all the neighbouring flowers get more space to grow as well!

Plants instead of sowing

Spring 2021

Worried I wouldn’t see results this year, and also prompted by Gail and gardening gurus such as Monty Don, I decided to also try planting pre-grown flowers this spring rather than just relying on the seeds. I might have a go at growing my own from seed next year, but this year I wasn’t organised enough and so bought 50 plants – an expensive approach, especially when rabbits had half of them before they had a chance to establish!

And the results?

Spring 2020

Well, not a lot happened in spring and summer 2020, following the scarifying and sowing in autumn 2019. There were a handful of poppies and cornflowers, some birds foot trefoil….it was disappointing, but I was expecting it. Most of the flowers take the first year to establish themselves and don’t flower until the next.

The one flower that did well was the yellow rattle – perhaps not surprising as I’d sowed so much of it. And the effect on the grass was noticeable. The photo below from the end of the season (September 2020) shows the area where the yellow rattle had been. Notice how patchily the grass has grown compared to the surrounding areas.

The effect of yellow rattle sown into grass – green areas where grass has been held back.

Spring/Summer 2021

Well hurray! This June the 2019 sowing is beginning to show. May brought lots of daisies and buttercups which we’d already had, but then this month we’ve had an abundance of yellow rattle, common vetch and ox-eye daisies. The birds foot trefoil is also beginning to show.

I’m not sure how well the molehill seeding has worked – I may have sowed them too late, or it may be that, as with the 2019 sowing, the real results will come in the second year. That said, I do have some poppies coming up from a few molehills, so maybe these are early good signs…

Poppy in a molehill

The plants I bought and planted earlier this spring (those that survived the rabbits), are also doing well – already much bigger and more established than the plants sown two years ago, like the red campion and red clover pictured below.

What next? New discoveries this week!

While writing this this week, I’ve also been talking to people on the Moor Meadows Facebook group about no dig approaches to meadow making. There have been two types of suggestion: 1) Use nature’s opportunities – e.g. sow in mole hills or where animals have dug, or 2) Mimic nature – e.g. mow the grass very short as though it has been grazed, tread the seeds down in to the soil like an animal treading on the ground.

I love the molehills approach and will do that again this autumn, although I am yet to find out if it’s going to work. I’m also going to take advantage of an area of bare earth in the corner of the meadow where Brian has done some landscaping and have already bought a wildflower and grasses mix to sow there.

Maybe I should get me a few sheep too – let them do the work.

Rough grassland discovery

One really important piece of information that I got from the Facebook group – and it’s kind of thrown everything I’ve done up in the air – was that the thick Yorkshire Fog grassland that we have here is a really valuable habitat for mice and voles, and therefore also for their predators – barn owls for example. Known as ‘rough grassland’, if the grass is left to grow and then left to die back down (rather than cutting and clearing, as I’ve been doing), it creates a litter layer of dead thatch under the new grass – great for little critters to burrow. And wildflowers grow in it too – perhaps just not as many as the hay meadow. A really good video on this here.

Wow! There was me thinking that because the Yorkshire Fog was not ideal for hay meadow making it didn’t have any value at all. Pretty stupid assumption really. I’m so glad I know this now. I’ll probably still continue the hay meadow approach of cutting and clearing the areas where I’ve already sown seeds, but this has certainly made me think twice about attempting to convert the whole area to a hay meadow style wildflower area. It feels like I am learning a very important lesson in working with nature where it wants to be not where I want it to be!

What on earth is ‘earthing up’?

As I greeted my emerging potato plants with glee a month or so ago, I wondered about the whole earthing up business. What’s it all for? When and how should I do it – and why??

The last two seasons, since I started growing potatoes, I’ve been dutifully chucking earth onto my potato plants as my Dad told me to, but I’ve never really been sure of what I was trying to achieve and if I was achieving it! (Except that I did have a pretty good harvest last year)

So anyway, I thought I’d do some investigating into the whats, whys and hows of earthing up, and share with you, lucky reader, in as simple and unbamboozling way as I can.

What is earthing up?

Earthing up, aka hilling up, is basically adding earth around the base of a growing plant – in this case, a potato plant.

Why is earthing up a good idea?

Potato plant

In my research I’ve come across these three benefits:

  1. It prevents light from reaching the potatoes
  2. It increases yield
  3. It protects plants from frost

1. Blocking out light – Potatoes that grow close to the surface can become exposed to light. If this happens they will start making chlorophyll (which turns them green), as well as a toxin called solanine. We all know we’re not supposed to eat green potatoes, but the green-producing chlorophyll isn’t the problem, this is just an indicator that the potato has been exposed to light and therefore also contains solanine – which is a problem as it’s poisonous to humans (not likely to kill you, but could definitely make you ill if you eat too much). Therefore, if we periodically cover the surface near the base of the plant, we can block out light to any potatoes that have decided to grow up near the surface.

2. Increasing yield – I guess it stands to reason that if a lot of your potatoes are green when you harvest them and you have to throw them away, then this decreases your yield. However, some sites say that earthing up can actually increase yield by ‘increasing the length of the underground stems that will bear potatoes’ (this from the Gardeners World website). I haven’t been able to find a more detailed explanation of how this works, but this infographic (follow link) does help a bit. It shows how with each earthing up more of the stem is buried, and once buried, the stem sends out shoots for more potatoes to grow on.

3. Protection against frost – This one is easy to understand. Spring plants need protection from late frost. I don’t think this is strictly a reason for earthing up (there are other ways of keeping plants warm, like fleece), but it’s a useful side benefit.

Different approaches to ‘earthing up’

The traditional method – The traditional method is to pull the surrounding soil up around the plant. If you’ve got your potatoes in rows you’ll end up with ridges as in this picture.

Potatoes earthed up into ridges

In my first two years of potato growing I’ve done roughly this, but with a couple of differences:

  • No ridges – The potatoes were in a block, and I imported new soil rather than pulling it from between the plants as there wasn’t enough room between plants for that,
  • Covering the plant – I followed my Dad’s method (which, from my research, seems a bit unusual – but not unprecedented), which was to almost cover the plant entirely, just leaving a little bit of green leaf showing. It never seemed to damage the plant and they just pushed on up and out.

This method seemed to work really well last year – no photo, but I promise you, it was a great harvest!

Potato bed 2020 just before harvest – Earthed up the traditional way

Mulching/No Dig methods – Many sites I have looked at now advocate using an organic mulch such as compost, straw or grass clippings to earth up instead of soil. Besides feeding the soil, this also means the potatoes are growing in a looser medium, and can easily be pulled out without the heavy digging.

In this video No Dig guru Charles Dowding shows how he does it, calling it ‘composting up’ rather than ‘earthing up’ (fast forward to 8:05 for this).

Some sites, like this one, Growveg, suggest that the seed potatoes are simply laid on the top of the soil and then covered in straw which is regularly topped up instead of earthing up.

My 2021 Earth Up Mash Up

I ended up doing a bit of a mash up this year – more by accident of having mixed up the methods in my head, rather than by conscious design. I planted the seed potatoes a few inches down into the compost layer that topped the beds. Then, instead of ‘earthing up’ I have been experimenting with ‘grassing up’. We have such an abundance of grass clippings at the moment – plenty to feed the compost bins and lots left over for the potatoes. Here in this pic you can see the first week’s grass on the left – the plants have pushed out above it during the week – and the newly piled on grass on the right.

Week 1 grass on left, Week 2 grass on right

I missed out a week last week (week 3) and applied more again today – today more of an ‘around the base’ approach today rather than covering them up completely, as they are so tall now.

Week 4 – Grass just around bases rather than on top

A few more weeks and I’ll be able to share whether or not the potatoes are a good as last year – taste and yield! But as far as earthing up goes, this method is a winner for me for a few reasons:

  • Grass clippings are free and plentiful at the moment
  • They’re light and so easy to put on (no heavy work heaving around soil or compost)
  • They’re keeping moisture in really well

Something that may be a drawback is the heat that newly cut grass can generate. I noticed that it was quite hot when I put my hand in (I’m familiar with this because on the compost heap it can get up to 7o°c after grass is added). I also noticed some discolouration on the stems which I wondered if might be caused by too much heat (see picture below).

Discolouration of stem – due to heat damage?

Today I’ve read that potatoes grow best in cool temperatures, lower than 20°c, so maybe letting them get too warm is a mistake. As a precaution, when I added new clippings today, I mixed them up with the dry ones from last week so that more air will flow through and less heat get generated.

I’ve got three potato beds on the go growing three first early varieties – Nadine, Pentland Javelin and Maris Baird – so I could have tried out a few approaches side by side. Having said that, this way of earthing up has been so easy, if the potatoes are good I’ll stick with it in future for sure.

How do you earth up? Let me know in the comments section.

Talking to Gail about her springtime woodland pathway

Early on a misty morning last week, I commandeered our brilliant gardener Gail and asked her all about one of her recent planting projects here – beds running alongside a new pathway to the house, cutting through a densely wooded and wild area. Read on and watch the videos to find out how she’s working with the existing surroundings, adding colour and interest, while maintaining and enhancing the wildlife habitat.

The Planting Design

Last summer Brian took to creating a path from the driveway to the house, using original 19th century bricks that he’d kept after taking down a wall inside the house. It’s a beautiful celebration of the heritage of the house, and something to be proud of, so we couldn’t let it get overgrown with the nettles, ivy, bramble and sumac that surround it. We asked Gail to design some beds that would work with the natural feel of the area but also show off the path.

I first of all asked Gail how she came up with her design for the beds…

As you’ll see from the picture at the top, the path does get some sun for a while in the afternoon, but on the whole it’s a shady spot, with a wall of thick undergrowth and shrubbery flanking it on either side, and trees arching and towering above.

This whole garden has been about working with nature, and enhancing nature where we can.

Wanting to preserve this wild and vital space, whilst pushing it back a little from the path, Gail decided to choose plants that would not only provide colour and a ‘bit of bling’ as you approached the house, but could also hold their own against their vigorous neighbours and tolerate the shade.

The Choice of Plants

In this next video Gail talks about the flowers looking at their best now, in mid-spring…

Providing the colour splashes at the moment are white wood anemones, four types of euphorbia giving lime green and purple, pale blue forget-me-nots, purple-blue grape hyacinths and of course, daffodils for the sunshine yellow.

Gail has also cleverly planted honeysuckle at the base of two old elder trees that are arching over the path.

There are many dead and semi-dead trees in the garden, but we don’t want to get rid of them, because they provide structure, and habitat for wildlife.

A piece of useful experience that Gail shares here is that you never quite know how well a plant will grow until you’ve tried it out – some love a spot and thrive and spread out, others are just not so keen and stay small. So a well planned, carefully spaced-out bed can become gappy in some spots, overcrowded in others. Like all best laid plans, you need to expect things to go a little awry here and there, and adapt as the seasons unfold – in this case, once the flowers have died down later in the year, a bit of moving and separating is in order.

Flowering throughout the seasons

Finally, I asked Gail to talk us through what we could expect from the beds throughout the rest of the year.

  • Geraniums – Lots of different geraniums. Gail calls these ‘doers’ because they are so reliable at bushing out and providing lots of colour.
  • Pachysandra and euphorbia – Evergreens for winter coverage and interest
  • Nepeta (cat mint) – will bush out and provide blue colour
  • Asters, Tuecrium
  • Helebore – flowers through the winter

Creeping into the wild

While we wait to see how all these plants get on this year, we’re also pushing into the wilds a bit – creating a natural path into the densely wooded area next to the brick path. It’s got a real fairy grotto feel to it – a great secret hide as you can see from the picture below!

Wildflowers at Langdon

Just as I get excited by the fungi that turn up cheekily and uninvited during autumn (“Invitation? Whoever said we needed an invitation?” said the Common Earth Ball to the Shaggy Ink Cap), I also love coming across wild flowers popping up from every untended nook and cranny they can find at this time of year. I could call them weeds and get stressed about them, but where’s the fun in that?

Here’s a selection of some I’ve found this week…

Red dead nettle

Lamium purpureum

Red dead-nettle (Lamium purpureum)
Red dead-nettle and a bumble bee

Red dead-nettle (although the flowers and leaves are purple) is an annual flower of the mint family (Lamiaceae). It’s one of several flowers from this family known as ‘dead-nettles’ because, although they resemble stinging nettles (Urtica dioica), they’re quite friendly with no sting at all. One of its alternative common names, ‘archangel’ might also be because it doesn’t sting.

I’ve also read that it’s sometimes called ‘the bumblebee flower’ – our bees like it, that’s for sure.

It’s found growing all over the UK, especially on disturbed or cultivated ground. Here it is on a mound of earth that was dug up about two years ago for a landscaping project and while we’ve left it there until we get back to the job, nature has moved in, keeping the ground vital and healthy. It’s now covered in wild flowers, and often there’s more buzzing and fluttering here than any other part of the garden!

White dead nettle

White dead nettle (Lamium alba)

Lamium album

White dead nettles look a lot more like stinging nettles, but again are quite benign. I have seen suggested that they may have evolved to look like stingers as a defence against predators. They’re from the mint family (Lamiaceae) again, but are perennial, unlike the annual red nettle above.

They also love disturbed soil so can be found all over our garden in the many messy ‘work in progress’ areas.

Their delicate white flowers appear from early March – perfect spring foraging for pollinators, especially bumble bees who emerge earliest in the year.

With my years of townie life, nettles to me were always those nasty pointy-leaved bushes that made me cry when I was little. It was a revelation to know that we have other nettles growing abundantly in the UK (albeit not actually related to the stinging sort), that are beautiful and benign. They ought to have a less forbidding name than ‘dead-nettle’, I think.

Ground Ivy

Glechoma hederacea

Ground ivy (Glechoma hederacea)

Despite its name, ground ivy is also in the Lamiaceae family, and also classed as a ‘dead nettle’ (though to my mind, there’s no need to reassure me on this one – it’s clearly nothing like a stinger!).

It’s a perennial evergreen creeper that forms a mat on the ground, just like ivy – great for ground cover and shady areas, but a problem if it’s tidy beds and lawn your after. I liked how a site called Eat the Weeds put it: ‘it’s the Botanical Bull in the China Shop. It doesn’t take over, it takes command‘.

Here it loves those same messy, churned up in-between spaces as its other dead-nettle siblings. Not a problem for us at the moment – but maybe we’ll have to take on this botanical bully at some point.

Finally, I must mention (meticulously researched on erm…Wikipedia) some of its other wonderfully poetic common names: gill-over-the-ground, creeping charlie, and run-away-robin

Lesser Celandine

Ficaria verna

And now, not a dead nettle – this time its a member of the buttercup family: the lesser celandine. These sunny star-shaped flowers started appearing here early in spring and their cheerful faces were so welcome. Like all they can be invasive and troublesome, but here in our brick and random junk storage area, they make a wild and sparkly carpet of boldest green and yellow.

Final fun fact is that one of its other names is ‘pilewort’ – a clue to its traditional use as a treatment for piles or hemorrhoids – good to know!

Common Field-Speedwell

Veronica persica

My wildflower book has two packed pages of different speedwells (also called ‘veronicas’) – all of which have these tiny blue flowers. Peering back and forth between my book and this photo I think I’m right that this is the Common Field-Speedwell.

I liked this bit of etymology from the Kent Wildlife Trust website, that the name Speedwell is from the flowers habit of growing on roadside verges where it would wish travelers ‘good speed’. I’ll grab me some when I’m dashing out late for the school run perhaps.

That’s my wildflower (aka weed) appreciation slot for this month. Next post I think we should trumpet some of many gorgeous, and altogether better-behaved and less presumptuous flowers that our lovely gardener Gail has been planting around the place.

The Babe and the Old Timer – Tales of Two Ash Trees

Tree Diaries ~ Apr 2021

The arrival of a new tree a few weeks ago has inspired me to write another ‘Tree Diaries’ post – taking time to have a close up look at two more of our trees. This time, they’re both ash trees, but at very different stages of life: one but a babe, the other is an old timer.

The Babe

Julie’s Gift

The smiling woman in the photo above is my green-fingered friend, and Plastic Free Faversham team mate, Julie Beer. A month or so ago, she messaged me to say she’d read this blog and seen all the tree planting that we were doing, and asked if we could adopt her young ash tree. She discovered it five years ago in a plastic pot in her garden – it had decided to sow itself there. Over the years she’s nurtured it as it’s grown, moving it into a bigger pot and watering and feeding it along with her veggies. Now over 5 feet tall, it was time to get its roots into open soil, in a place where it could live for the rest of its life.

It is clear that Julie has given so much love and attention to this tree so I feel really honoured (and a BIG sense of responsibility!) to be its new custodian. I intend to look after it really well and I’m sure Julie will be visiting to see her young charge spread its branches.

Current Age and Size

  • 5 years old
  • 1.65 metres tall

‘Common ash’ or ‘European ash’ trees can live up to 400 years, although about 200 is more typical (and sadly maybe a lot less for many UK trees due to ash die back disease – more on this later in the post). They are some of the tallest trees in the UK and can grow up to 35 metres tall – hence their Latin name Fraxinus excelsior: Fraxinus, meaning ‘of the Ash genus’, and excelsior meaning ‘higher’.

On the Edge of the Wild

I’ve planted Julie’s ash at a point where formal and tidy meets wild and untamed. To give it the space it needs to establish itself, and so that it’ll be easily accessible to visit and tend to, I gave it an area of its own using a mulch of wood chippings and some fallen branches to delineate the space. Lush nutritious nettles will soon be growing all around the edges of the area. Beyond, the weedy wilderness which will soon be emerging, and just a few feet in front, the lawned formal border to the driveway. So, well connected to our human everyday comings and goings, but firmly rooted in a thriving, diverse ecosystem. There are a few tall, mature trees nearby – two ailing pear trees that won’t last last enough to be any competition, and a silver birch far enough away for a great ash tree to spread out next to.

Black Buds, Purple Flowers and Green ‘Keys’

Black buds on our young ash tree

At this time of year, there are no leaves to talk about, only these little black buds. Julie compared them to tiny deer feet – and I see what she means – although in this photo I think they look rather like tiny devilish fingernails! These unusual black buds make the ash easy to identify in winter when there are no leaves, flowers or fruits to go on. Research tells me that during spring these buds will produce purple flowers as you can see in the image below that I found online. These will either be male or female flowers as ash trees are usually dioecious, i.e. having all female or all male flowers. However, occasionally a tree can have both – and sometimes they even switch from male to female in successive years!

When we get some flowers then, I may be able to tell the sex. Although, having said that, the flowers on males and females look pretty similar to me (female flowers are slightly longer apparently) so it may be hard to tell. We will know with more certainty later in the year, however, if the flowers produce the ‘keys’ shown in the picture on the right above, as these are the fruit produced by the pollinated female flowers.

Let’s see what the seasons reveal!

The Old-Timer

Our old ash is a favourite of mine. I’ve written about it before in my post The Woodpecker in the Ash. In that post I shared how it was watching a woodpecker visit the tree every morning as I drank my coffee in bed that had really drawn me to it. Much of its crown is dead now, but that decay is only serving to attract an even greater influx of life, as lichens, mosses, ivy and invertebrates abound.

Current Age and Size

  • Height: ~ 20 metres
  • Diameter of crown: 21 metres
  • Girth of trunk: 3 metres (circumference at 1m height)
  • Age: ~120 years (A rough calculation based on 2.5 cm growth of trunk girth per year)

So, one of the oldest and tallest trees here, but sadly not going to be one of the three hundred year old, 35 metre giants. I love to imagine Julie’s ash being a worthy successor in a hundred years time. If it can survive the ravages of ash die back that is (more of this later in the post).

A Dying Crown

The most obvious sign that the tree is dying is the fact that most of the crown no longer produces leaves. The leafiest part is the dress of ivy it wears so fetchingly. I can’t find a photo from the summer when it’s in leaf to put in here, but I’ll write a follow up later in the year, with pictures, so I can document the full extent of the dead/living branches. I have also learnt that this is important for watching for signs of ash die back disease (see below).

Another sign of the poor health of the tree is missing bark and rotting interior in the front section of the base. A visiting tree surgeon suggested a few years ago that perhaps the demise of the tree has been due to being so close to our pond, having its roots too wet. In his opinion at that time, the cause is not ash die back.

Lichens, Mosses and Fungus

‘Ash represents the whole world for many lichens and the invertebrate fauna which depends on them.’ So says the Ash Project based here in Kent. The high pH of ash bark makes it uniquely hospitable to lichen, with 536 different species living on it – 220 of these are considered nationally rare. I must say, until recently I was foolishly indifferent to lichen, but having had a close up look at some of the branches that have fallen off the old ash, I am bewitched.

Moss and lichen on fallen ash branch – Nov 2020

I love the beautiful moss in this picture too. I think it’s ‘Wood Bristle Moss’ (Orthotrichum affine) which particularly favours ash. I’d like to call it Star Moss though – don’t they look like little green starbursts?.

I also adore this picture of another fallen branch – the gelatinous Witches Butter fungus (Tremella mesenterica) is star of the show, with a couple of gorgeous lichens as supporting acts.

Witches Butter fungus (Tremella mesenterica) on ash tree branches – Nov 2020

A few notes on ash die-back disease

Julie’s kind offer of her young tree ended up with both of us going on quite a research quest. Was it right to share and plant ash trees in light of the risks of ash die back disease?

Ash is the third most common tree in the UK, with approximately 150 million mature trees around the country (1). However, during the 1990s, a devastating fungal disease called ash-die back (Hymenoscyphus fraxineus) was imported into Europe from Asia and rapidly spread, killing off huge numbers of ash trees. Tragically, there is no known cure, and research suggests that seven or eight out of every ten ash trees in the UK will die of the disease. A possible glimmer of hope is that some trees have shown a level of tolerance, and isolated ash trees (such as those in hedgerows, open fields or gardens) may be less affected than those in woodland.(2)

I was uncertain for a while as to whether planting Julie’s tree was the right thing to do. A couple of local tree experts had told me to avoid planting young ash trees – that young trees were more susceptible to the disease, and could perpetuate the spread. Since 2012 all imports and sales of ash trees have been banned by the UK government (3), so I could not buy a young ash, and it is only because one decided to grow in Julie’s garden and she has nurtured it that it has come to be. Should she not have let it grow? Now that it’s a seemingly healthy 5 foot tree, should we not continue to nurture it in the hope that it might resist the tide of disease? I just didn’t know what to think.

In the end I was encouraged by the Tree Council’s advice to tree owners:

By retaining trees with no or limited signs of ash dieback, owners and tree managers might allow precious ash dieback-tolerant trees to live and reproduce.

In addition, dying and dead ash trees have huge ecological value, especially
mature, veteran and ancient trees, so provided that they are managed following current
guidance on tree risk management, it’s important to keep them in the landscape.

‘ASH DIEBACK DISEASE: A GUIDE FOR TREE OWNERS’, p5, The Tree Council, June 2020.

So, whilst deliberately cultivating ash trees is not advised, and planting alternative native trees should be our focus, ‘retaining’ what we have – both the young and the old trees – seems to be more beneficial than getting rid of them. We need to be responsible and watchful though. At the moment I don’t believe either has the disease, but I intend to review this each summer when the tree is in leaf so it’s easier to look for signs of die back. Diseased trees don’t necessarily have to be felled – their benefits as deadwood to wildlife are potentially greater than any risk they pose. Of course dead branches can be dangerous and so we’d have to cut down any that could fall and hurt someone. Also, if one of the trees was diseased we would need to clear and burn fallen leaves and branches to help reduce the spread.

I never imagined whether or not to plant a tree would be such a thorny question and lead me into such a depth of research. But it’s been fascinating and now that I’ve decided to embrace Julie’s ash and given it a home, I’m really looking forward to seeing how it matures and keeping my eye on it – and its old timer cousin – will they survive this devastating disease, or will they succumb?

The Old Ash and an April sunset – April 2021

(1) The Ash Project – https://www.theashproject.org.uk/

(2) Ash Dieback: A Guide for Tree Owners – The Tree Council, June 2020 – page 3

(3) Government bans imports of ash trees, (2012) https://www.gov.uk/government/news/government-bans-imports-of-ash-trees

Alders by the Pond 2

Tree Diaries ~March 2021

In this post a month ago I introduced you to our two alder trees, which I’ve nicknamed Al and Glute. Over the past month, Glute has been developing the most sumptuous catkins as you can see from the pictures below.

The distribution of catkins isn’t random at all – just three branches, all at mid height, have catkins – two or three bunches per branch, all about mid-way up the branch.

A fun thing to discover was the lime green pollen that comes from the male catkin if you rub it between your fingers. This must be how the legendary dye – said to have been used by fairies and Robin’s Hood forest outlaws – was made.

Lime green pollen used to make green dye

Zooming in on the most recent picture above we can see the tiny female catkins beginning to flower as the male ones in front crumble. Delicate purple petals emerging.

Flowers on female alder catkins emerging – Mar ’21

For some reason, the other alder, Al, has had a very inactive month – not a single catkin. They’re the same age, planted at roughly the same time, from the same nursery. They’re both in the same boggy pondside soil. As I took these photos this morning I noticed that Al was in the shade and Glute in full sun, and though Al will get a few hours sun during the afternoon I would say Glute gets more overall. Could this explain why Al hasn’t flowered? Not sure.

A quiet month for Al

Look out for more exciting Al and Glute updates!

Springtime here we come!

Oh yes – this is VERY welcome. Warmer and finally, drier. Our boggy, saturated ground is at last getting a breather – and so are we. It’s been such fun this week, starting to put the wintertime planning and preparation into action. I get the impression this is how lots of gardeners feel at this time of year – personally I feel like an eager puppy who’s been let off the leash!

This is me!
(Image – CC2.0, SomewhereinLife, Flickr)

Welcoming back Gail and John

It was wonderful on Wednesday to welcome back both Gail and John to Langdon. Gail has been gardening for us since Spring 2019 and has created and developed many areas of the garden – from magnificent formal rose beds by the lake, to cottage garden floral abundance, to wildflower-led sections where the best of the self-seeders are welcomed to flourish. She teaches me a lot, and gives me encouragement when I get overwhelmed by the scale of our project. It’s so good to have her back as Spring kicks off.

Gail planting lavendar – Nov ’20

John started mowing here towards the end of last year and it’s so lovely to have him back with us again for the new season.

John and his trusty Hayter

Compost Kick-Off

Three-bin compost system from 10 upcycled pallets

My proudest achievement of the past month has been making this three-bin compost system – all by myself! This feels like big deal now, but I would love to get to a point when knocking up something useful for the garden out of a few pallets we’ve got lying around was just an everyday thing for me.

The Making Of….

The pallets came from our farmer neighbour. (If you’re looking for some pallets, try a local community sharing site or Facebook group – I checked ours and quite a few people were offering them for free over the past year). I was lucky to get these particular ones – not only are they very strong and sturdy, but being the same size it made it so much easier to put together and have a nice-looking end product. They also had all the right markings very clearly stamped on them so I could be sure they are safe to use, ie not treated with toxic chemicals which could leach into the compost. (The symbols to look for are EPAL (middle pic), IPPC (the logo on the right hand pic), and HT which stands for heat treated (right pic). Avoid pallets with the letters MB which means they have been treated with Methyl-Bromide, a toxic pesticide.

Once I’d stood 7 of the panels up to make the backs and sides, I could see that I didn’t really need to do anything to them at all except drill them together at the corners. Then I took the fronts off another three pallets to make the slide up and down ‘door panels’. When I say ‘took’, I mean wrenched – not a pretty sight. There was a lot of grunting (ARRRRR!!), and it took bloody ages sometimes, but hey – it turned out to be doable, even for a weed like me. I drilled wooden bars onto the fronts and little stoppers at the backs to keep these movable front panels in place.

Compost bin 1 lined with cardboard. In this image you can also see how the slide up front panel rests in place.

Finally, as you can see in the picture above, I lined the first bin (the first one to be used) with cardboard, attached with a staple gun. This is to keep in moisture/reduce air flow, because my previous outdoor compost attempts have been too dry – so it’s just an experiment really. We’ll see if it helps.

Why 3 bins?

The idea of the 3 bins is that you can have your compost at three stages of development/use.

  1. The Filling Bin is the one you’re filling, so it will always have a top layer of recently added, undecomposed material. Once the bin is full, move the compost into Bin 2. The process of turning it (ie material that was at the bottom ends up at the top) aerates the compost.
  2. The Leave It Alone Bin is the maturing stage. It still has some way to go before it’s ready to use, but it’s not being added to any more. After a few months, it’s moved again, into Bin 3.
  3. The Finished Compost Bin is the usable compost. Anytime you need some compost to use for the garden you take it from here.

Filling it up – Compost ingredients

A mix of nitrogen-rich grass and carbon-rich cardboard and woody cuttings.

Yesterday the garden had its first mow, providing loads of lovely nitrogen-rich green stuff to kick-start the first bin. I had some ripped up cardboard at the ready to mix with it, and a few woody cuttings. I’ve got an ailing chipper that I’m desperate to get working soon so that the supply of brown woody material will keep up with the influx of green that spring will bring. I also have a bucket of ash from our wood-burner at the ready and I’m adding a few handfuls of that here and there. Used sparingly, this adds a dose of extra nutrients such as carbon and potassium.

Finally yesterday evening I poked the thermometer in – only 30 degrees so far but hopefully it’ll start cooking soon – I’d love it to get really hot, in the 50+ zone. Then we’d really be making compost!

Veggie Babies

Seedlings sown on Valentine’s Day

Another exciting development of the past couple of weeks has been the start of the veggie growing season. On Valentine’s weekend I sowed spring onions, onions, cauliflower, mixed salad leaves, lettuce, dill, parsley, coriander, red bell pepper, and sweet peas. I kept them inside for the first week and a half but yesterday introduced them to a new home in the potting shed.

New shed all set up

Last weekend Brian kitted it out with a light, and an extractor fan to stop it over-heating. We’re not sure how effective the fan is going to be, so yesterday I put some white horticultural fleece over the window – hoping that will reduce the glare and full heat of the sun on the little seedlings. I’ll be keeping a close eye on my babies. And this coming weekend I’ll sow my next batch of seeds.

Experimenting with white fleece shade to protect from full glare and heat of the sun

Watering From The Well

I mentioned a couple of weeks ago that we have a well next to a gnarly old apple tree. During the heavy rain the water came up over the top and the tree became an island in a little lake. Now the water has receded again – about a foot below ground level as you can see in this not very good picture below. I had the idea to collect some water from it to water my seedlings in the shed and was totally shocked to find that the water was so crystal clear! Getting the water tested has now moved up my to do list – would be amazing if we could drink it too.

Making Tree Signs

One of my winter weather projects has been making these wooden signs to go under the trees. They’re made from pine timber off cuts, and I’ve painted the common names on one side, Latin name on the back. Some have the date of planting too.

It’s been a lovely project to do and I’m really pleased with how they’ve come out. I embarked on the project partly because I wanted to name the trees, but also to practice for a bigger project – naming the 11 wooden veggie beds. I have in mind that I’ll name each bed after a tree – rowan, willow, yew etc – but I’m still thinking. Perhaps I’ll use funky fungi names instead. Watch this space.

‘Eat The Seasons’ Course

Finally, I’ve started a new monthly online course with an amazing local business, Wasted Kitchen. Last year I realised the extent to which it’s no use having a bumper crop of fruit and veg if you haven’t got lots of different recipes for using it, as well as the skills to store and preserve for the winter months. So when I saw this course advertised, I jumped at it. Each month the class focuses on the food of the season, with tips and ideas on how to prepare, cook and preserve. I learned loads at the first one last week and can proudly say that I now know what to do with a celeriac! If you’re interested, take a look here.

I think I’m finally through all my news. It’s so good to have lots to tell after the long winter. 🙂

Alders by the Pond 1

Tree Diaries ~ Feb 2021

So this is the first in a new series of posts called ‘Tree Diaries’, where I’ll be focussing in on just one tree, or a small group. I’ve gained a lot of scrappy, ad-hoc knowledge about the trees we have here over the last couple of years, but these posts will give me a space and an incentive to get up close and personal, really get to know individual trees – as one of a species, but also as individuals with their own life history, health, habitat and so on.

So, to begin I am starting with two young alder trees that we planted a few months ago in November 2020. I have decided they need names (‘the one on the ash tree side of the pond’ isn’t much fun is it?), and I’ve come up with Al and Glute, playing with their Latin name, Alnus Glutinosa.

So here they are…meet Al (on the left) and Glute (on the right). They’re both right by the pond, not together but able to give each other a wave, as you can see with my little purple drawings (otherwise they’re too hard to make out on the photo)

Names

Alnus Glutinosa is the Latin name, so I’ve nicknamed mine Al and Glute. In old English the name was Alor. The ‘glutinosa’ part comes from the fact that the young twigs can be sticky. This type of alder is on the Woodland Trust ‘native tree list‘, growing in the UK since the last ice age, 10,000 years ago.

Age and Size

They are both about two and half metres high at the moment. They are fast growing trees – about 60cm a year – so this means they’re probably about 4-4.5 years old. Alders are relatively short-lived trees, tending to live to around 100 years old, and getting to a height of about 20 metres. Here’s how they may look in 30 years or so….

Alder tree by the Tanyard Bridge, in January
cc-by-sa/2.0 – © Stefan Czapski – geograph.org.uk/p/3826842

Stats as of 18 Feb ’21

  • Height: Al – 2.7 m, Glute – 2.5 m
  • Girth at 1m: Al – 7cm, Glute – 6 cm

Flowers and Fruit

Alders are ‘monoecious’, meaning that they have both male and female flowers on one tree. I had this in mind when I was thinking of names for them – I toyed with Alan and Alice for a while but decided if I was going to anthropomorphise, I’d at least try to be accurate, hence the gender-free Al and Glute.

Al (on the right below) only has its winter leaf buds at the moment, but Glute (on the left) is getting ahead, with several clusters of these purple catkins. The long, hanging catkins are where the male flowers will grow over the next couple of months. The smaller ones growing behind are where the female flowers will grow, forming into cones (alder are the only native deciduous tree to have cones). I’ll update with more pics as they develop.

Water lovers

The thing to know about alder is that they like to grow in wet and boggy places – so they’re hopefully loving having their roots in the wet soil around our pond. Sometimes the water level rises almost to their trunks, but as far as I know, that’s just fine with the alders. Out of the water, their wood is soft and spongey, but in the water the wood becomes rock hard. It’s because of this that historically alder has been used to make underwater structures such as bridge foundations, sluice gates and boats.

Symbiotic Partner

Alder has a symbiotic friend called Frankia Alni. Here it is….

Frankia alni modules on alder roots (Image from Wikimedia Commons)

Frankia alni is a bacteria that creates these nodules on alder roots. It’s a good thing – a beneficial partnership – as the tree provides the bacteria with sugars and the bacteria provides the tree with nitrogen. This process also enriches the soil around the tree with nitrogen, benefiting the nearby plants too. So a good set of neighbours to have if your soil is a bit poor. I’m not sure how I’ll know if Frankia alni has turned up and is doing it’s thing without digging around the roots, but I’ll keep an eye out.

Wildlife and Alders

The alder invites an exciting range of wildlife. The leaves are plant food for the caterpillars of the alder kitten moth, the pebble hook tip moth and the blue-border carpet moth. The catkins are an early source of nectar and pollen for bees, and the seeds are eaten by siskin, redpoll and goldfinch. Except for the goldfinch, which are already very familiar visitors here, these others are all new to me. I hope we can attract a few of them!

Images above: Top left – Siskin (Isiwal/Wikimedia Commons), Top right – Goldfinch (Francis C. Franklin), Bottom left – Blue bordered carpet moth (Bennyboymothman/Wikimedia Commons), Bottom middle – Pebble hooked tip moth (Gailhampshire, Flickr), Bottom right – Alder kitten moth (Darius Bauzys, Flickr)

Portals to the Otherworld

Having been a part of our land for many thousands of years, alders ooze with mythology and mystical tales. They are particularly associated with fairies and said to be portals into the Otherworld. By some they were feared because of the way the pale wood ‘bleeds’ red/orange when it is cut.

The link to fairie, forest folk also comes from the strong green dye made from the catkins. This was the dye used to clothe Robin Hood and his outlaws, so they say.

Finally, here’s a poem by Ciley Mary Baker, one of her Flower Fairies series. They’re very sweet, and surprisingly informative. My daughter and I have learnt a lot about native wildflowers and trees from reading these poems.

The Song of the Alder Fairy

By the lake or river-side
Where the Alders dwell,
In the Autumn may be spied
Baby catkins; cones beside—
Old and new as well.
Seasons come and seasons go;
That’s the tale they tell!

After Autumn, Winter’s cold
Leads us to the Spring;
And, before the leaves unfold,
On the Alder you’ll behold,
Crimson catkins swing!
They are making ready now:
That’s the song I sing!

by Cicely Mary Baker

So that’s pretty much where I’ve got to with alders so far. I’ll be looking out for lots of action through spring – catkins flowering, leaves unfurling, bees foraging and caterpillars munching. I’ll write another Tree Diary next month with all the gossip from Al and Glute.